
how to create your own protocol implementation
As of mountebank 2.0.0, you can create your own protocol implementation in the language of your choice. You do not have to change the mountebank source code to do so. You can see a fully worked example at mountebank-http.
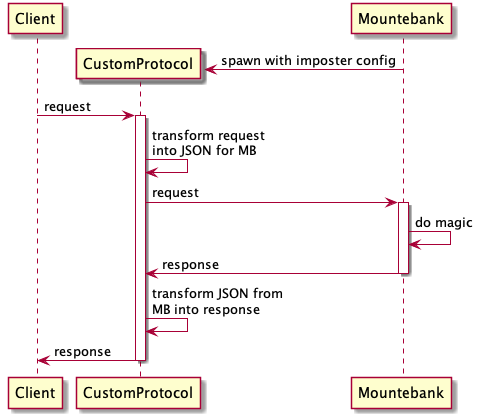
In mountebank land, a protocol has the following responsibilities:
- Listen for incoming requests
- Translate a network request into a JSON representation
- Pass the JSON request to mountebank, which returns a JSON response representation
- If necessary, proxy to a downstream server
- Translate the JSON response into a network response
The sequence diagram below -- thanks to Max Ludwig -- shows the general idea (without proxying):
Command line interface
To inform mountebank of your custom protocol, you create a protocols configuration file. By default,
this will be called "protocols.json" and is expected to reside in the working directory you start
mb in. You can change it with the --protofile command line flag. The following
configuration would override mountebank's built-in http protocol with
a custom implementation and add a new protocol called "foo". Start by adding the following to "protocols.json":
{
  "http": {
    "createCommand": "node http.js",
    "testRequest": {
      "method": "GET",
      "path": "/",
      "query": {},
      "headers": {},
      "form": {},
      "body": ""
    },
    "testProxyResponse": {
      "statusCode": 200,
      "headers": {},
      "body": ""
    }
  },
  "foo": {
    "createCommand": "java foo",
  }
}
You could run this with the following command:
mb --protofile protocols.jsonThe most important field is the createCommand, which tells mountebank the command line
information needed to start a new instance of the protocol. As far as mountebank is concerned, it's
just a shell command. That gives you enormous flexibility in how you implement it.
The other two fields are optional and used for validation. When a new imposter is created, mountebank performs
a dry run of the creation, testing all predicates and responses to make sure none of them return an error.
The testRequest and testProxyResponse fields should model the protocol-specific
request and response format, which will be used during the dry run. Adding them makes that validation
more robust.
When spinning up an imposter, mountebank will call the createCommand, passing a JSON
string as an additional parameter. When parsed into JSON, the object will contain the following fields:
| Field | Description |
|---|---|
port |
The port to listen to. While you are always free to require it, the built-in mountebank protocols make this an optional field. If it's missing, you are free to pick any open port. |
host |
If passed, bind to the provided host name |
callbackURLTemplate |
A URL template that will look something like "http://localhost:2525/imposters/:port/_requests".
Replace :port with the actual server port, and use that URL to communicate with mountebank.
Every time you get a new request, after converting it to JSON, you'll POST that JSON
to the given URL, and mountebank will give you the JSON response. |
loglevel |
The logging level. Everything you write to standard out (stdout) that starts with one of the standard log levels (debug, info, warn, error) will be written to the mountebank log. You may decide to use this parameter to optimize what you write to stdout. |
allowInjection |
The value of the --allowInjection command line flag. Use this if you have some custom
injection code mountebank is unaware of. |
defaultResponse |
The default response JSON object, to be used to fill in missing response fields in the responses provided by the user. |
| Custom protocol fields | Mountebank will pass any fields it does not recognize. This allows you to have custom metadata
(like the mode field in the tcp protocol). |
After you parse the JSON object, you spin up your server, listening on the provided socket. As soon as you write anything to stdout, mountebank assumes you have finished initializing.
The API
When a network request comes in, you translate it to a simplified JSON format and wrap that
inside an object with a top-level "request" key. For example, the following could
represent a messaging protocol with custom request fields for the message and transactionId:
{
  "request": {
     "message": "Hello, world!",
     "transactionId": 123
  }
}
The next step is to POST that body to the callbackURLTemplate
(with ":port" replaced with the actual server port if you changed it). Mountebank will respond with
one of the three following responses:
Standard response
Mountebank was able to determine the
correct JSON response to use. The POST response looks something like this:
{
  "response": {
    "statusCode": 400,
    "body": "Error!!"
  }
}
All you have to do is to merge in the missing fields from the defaultResponse,
and translate the JSON to a network response.
Proxy response
If mountebank determines you need to proxy to fulfill the response, it will send a payload that looks something like this:
{
  "proxy": {
    "to": "http://origin-server"
  },
  "request": {
    "method": "GET",
    "path": "/",
    "query": {},
    "headers": {}
  },
  "callbackURL": "http://localhost:2525/imposters/3000/_requests/0
}
Your job at this point is to forward the request on to the given proxy configuration. This requires
you to translate the JSON request into a network request to the proxy, and translate the captured
network response into a JSON object. Then you POST the JSON response to the provided
callbackURL. Mountebank will return you a standard response as shown above.
Mountebank will be responsible for saving the proxy responses; you do not need to worry about it.
Blocked IPs
If you are running mountebank with either the --localOnly or --ipWhitelist
command line flags, it's possible that the originating IP address of the request should be blocked.
You must add a field to the JSON request called "ip" with the originating address, and if it should
be blocked, mountebank will return something like the following payload:
{
  "blocked": true,
  "code": "unauthorized ip address"
}
In such scenarios, it is recommended that you kill the connection rather than return an error. Mountebank will not return you a response.
Logging
Every message you write to stdout that begins with one of {debug, info, warn, error} will be written
to the mountebank log. While not strictly necessary, you can optimize the writes with the
loglevel parameter. The following creates a log function in JavaScript:
function createLogger (loglevel) {
    const result = {},
        levels = ['debug', 'info', 'warn', 'error'];

    levels.forEach((level, index) => {
        if (index < levels.indexOf(loglevel)) {
            result[level] = () => {};
        }
        else {
            result[level] = function () {
                const args = Array.prototype.slice.call(arguments),
                    message = require('util').format.apply(this, args);

                console.log(`${level} ${message}`);
            };
        }
    });
    return result;
}

const config = JSON.parse(process.argv[2])
    logger = createLogger(config.loglevle);

// Use as log.info('This is an info message');
Error handling
If you exit before writing to stdout, exit with a non-zero exit code. The user will get a 400 error.